This beginners tutorial talks you through how to write python programs for a micro:bit that can respond when you press a button or touch one of the input pins along the bottom of the device.

Try the code: Python microbit basics: buttons and touch pins
The code below turns a micro:bit into a counter: press button A to count down, button B to count up and touch pin 0 to reset back to 0. Try it out and then read through how it works.
You could use this to keep score in a competition, especially if you use two or more micro:bits – one for each team.
After line 3 imports the micro:bit module so that python can start controlling the inputs and outputs, line 5 and 6 create two new variables: counter and new_value :
# https://blog.withcode.uk/python-microbit-basics-buttons-and-touch-pins
# micro:bit counter
from microbit import *

counter = 0
new_value = 0

# keep looping forever
while True:

    # decrease by 1 if button A was pressed
    if button_a.was_pressed():
        new_value = counter - 1

    # increase by 1 if button B  was pressed
    if button_b.was_pressed():
        new_value = counter + 1

    # reset to 0 if you touch pin 0
    if pin0.is_touched():
        new_value = 0

    # stop counter from going less than 0
    if new_value < 0:
        new_value = 0

    # scroll new value if it's changed
    if new_value != counter:
        counter = new_value
        display.scroll(str(counter))

    # avoid hogging all the CPU time / using too much power
    sleep(50)
The variable counteris used to store the number that is displayed on the micro:bit at any given time.
The variable new_valueis used to detect if the number has changed so that the new number can be scrolled on the screen.
Both variables store whole numbers only (e.g. 1, 2 or 3, not 1.4, 1.7 or 3.8). We call these types of numbers integers
# https://blog.withcode.uk/python-microbit-basics-buttons-and-touch-pins
# micro:bit counter
from microbit import *

counter = 0
new_value = 0

# keep looping forever
while True:

    # decrease by 1 if button A was pressed
    if button_a.was_pressed():
        new_value = counter - 1

    # increase by 1 if button B  was pressed
    if button_b.was_pressed():
        new_value = counter + 1

    # reset to 0 if you touch pin 0
    if pin0.is_touched():
        new_value = 0

    # stop counter from going less than 0
    if new_value < 0:
        new_value = 0

    # scroll new value if it's changed
    if new_value != counter:
        counter = new_value
        display.scroll(str(counter))

    # avoid hogging all the CPU time / using too much power
    sleep(50)
Lines 9 makes all of the lines that are indented underneath it (lines 10-33) repeat forever.
You can see on line 12 and 16 how to check if a button has been pressed. There are two ways of doing this: button_a.is_pressed()checks to see if the button is currently being pressed at that exact moment in time whereas button_a.was_pressed()checks to see if the button has been pressed at all since last time you checked (or since the program started).
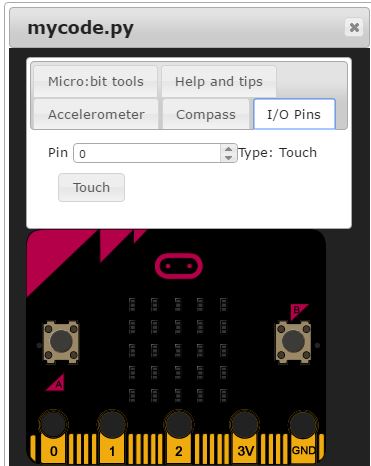
Line 20 checks to see if someone is currently touching pin 0. You can test this in the simulator using the I/O pins tab when you run the code in your browser:
How to test the I/O pins one the micro:bit simulator
There are 20 pins on the micro:bit that run along the bottom edge of the device. You can find out about each of them on the micropython documentation page but there are four types:
Analog pins: You can input (sense) a value from -1024 to 1024 or output (send) a value in the same range
Digital pins: You can input (sense) if they’re turned on / off, or output (send) an on / off signal to them.
Power pins: These are connected to the 3v power supply and can be used for powering other gadgets like additional LEDs
Touch pins: These are the easiest to use – they can detect the change in capacitance that happens when a human finger touches them so you can use them as touch sensors.
Pins 0, 1 and 2 can be used as touch pins. These are the larger, numbered pins along the bottom of a micro:bit.
# https://blog.withcode.uk/python-microbit-basics-buttons-and-touch-pins
# micro:bit counter
from microbit import *

counter = 0
new_value = 0

# keep looping forever
while True:

    # decrease by 1 if button A was pressed
    if button_a.was_pressed():
        new_value = counter - 1

    # increase by 1 if button B  was pressed
    if button_b.was_pressed():
        new_value = counter + 1

    # reset to 0 if you touch pin 0
    if pin0.is_touched():
        new_value = 0

    # stop counter from going less than 0
    if new_value < 0:
        new_value = 0

    # scroll new value if it's changed
    if new_value != counter:
        counter = new_value
        display.scroll(str(counter))

    # avoid hogging all the CPU time / using too much power
    sleep(50)
Lines 23-25 stop the counter value from going below 0 if you keep pressing button a.
Lines 28-30 might take some explaining:if new_value != counter: checks to see if the new_valueis not equal to counter , which will happen if you’ve just pressed one of the buttons.
display.scroll(…)expects its parameter (the value in brackets) to be a string (which is one or more letters / digits / characters). counter is an integer (whole number) rather than a string so str(counter)converts the integer into a string so it’ll work with display.scrollproperly.
sleep(50) on line 33 isn’t necessary but it’s a good idea to have it. If you didn’t and you tried to test the code in the simulator, your browser will crash. Testing it on a micro:bit would work but it’d use more battery power than necessary. In both cases, the problems are caused by the while loop repeating so quickly that the CPU is always busy. sleep(50) just pauses the program for 50ms, which isn’t long, but long enough for your browser / micro:bit to have a breather.


awesome post. Thanks for the post.
People should know why should they learn python
for more info see http://bindit.in/why-should-you-learn-python-programming-language/
Appreciate ! Keep such innovative postings.
Python Web Development
Wow – love this simulator. Haven’t managed to get into coding the micro:bit with anything other than the block editor up til now – this is LOADS better!
Here’s my first program, part of a Christmas display I’ve stuck on my classroom door here in Cambodia:
https://create.withcode.uk/python/NP
Press ‘A’ to announce the scroll the words of the angel.
Press ‘B’ to play ‘Away in a manger’ one note at a time (had to add the durations to every note, doesn’t seem to ‘hold’ the previous value whilst playing single notes otherwise – bug or feature?)
Q. How do I press A+B in the simulator?
I love your Christmas door display – thanks for sharing.
I’ve added a button to let you press both A and B at the same time to the simulator – thanks for the suggestion.
I don’t know about the bug / feature for playing notes – I’m in the process of updating the simulator to attempt to keep up with the new features of the micropython code (e.g. speech) so I’ll look into it.
Merry Christmas 🙂
Speech would be great. I did try the speech library but it said not found. I then tried copying it across to the ‘official’ microbit editor – the code compiled but then the micro:bit said it was out of memory 🙁