Adventures with Electronics is a father and son project to learn how to connect up and code 37 different electronic sensors using a Raspberry Pi Pico.
This post walks you through the hardware, software and firmware you need to get started writing code on a raspberry pi pico using CircuitPython.
Hardware, software and firmware
These tutorials use a Raspberry Pi Pico as a microcontroller: it’s a cheap, tiny programmable computer that’s a ideal for people who’ve never done any electronics or coding before (and for those of you with more experience too)
Hardware
The physical parts of a computer system that you touch. e.g. a sensor or microcontroller
The only hardware you really need to get started is a Raspberry Pi Pico and a micro USB cable. I’m going to use the original version of a pico without WiFi but any other version will work too. The more fun parts of the project will require a Pico Explorer board and pack of sensors. This post has more information with links to the hardware used in the Adventures in Electronics tutorials.

Software
The code that runs on the hardware. e.g. python that you write for your pico and also the apps you run on your laptop / desktop
I’m going to use Thonny to write python code on a windows laptop which will then run on the Raspberry Pi Pico. You can use any other IDE on any type of computer. Other good options are Mu or the PlatformIO plugin for Visual Studio Code but I’m not going to cover those here.
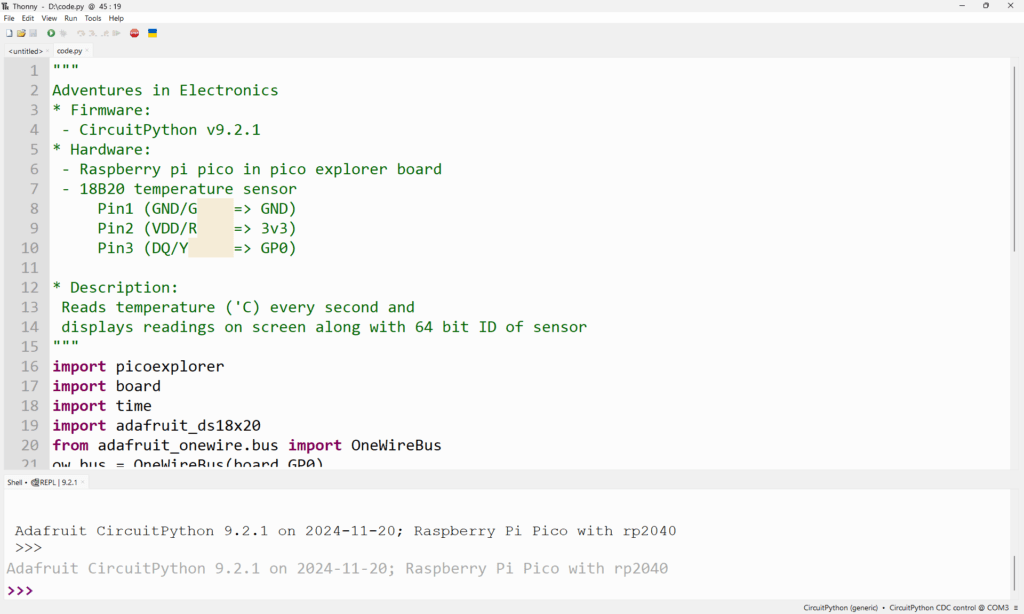
The screenshot above shows an example of using Thonny to write, run and edit python code that will run on a Raspberry Pi Pico
Firmware
The low level code that tells a microcontroller how to run your software on a microcontroller
A microcontroller like the raspberry pi pico can only understand binary instructions with 0s and 1s: it can only understand python code if it is given the binary instructions to do so. Firmware is the binary code which tells the pico how to understand and run your code.
There are two types of python code that can run on a pico: CircuitPython and MicroPython. Annoyingly, both are slightly different, they both have their own strengths and weaknesses and both require separate firmware in order to run, but you can change between them whenever you want by ‘flashing’ the firmware.
For the Adventures in Electronics series I’ll create and share code in both MicroPython and CircuitPython. The MicroPython code will be as simple as possible to make each sensor work that will run just on a pico without needing the Pico Explorer Board. The CircuitPython code will use the Pico Explorer board and occasionally some additional components to do more fun stuff.
You’ll need to flash the firmware to install CircuitPython before you can run any python code on your Raspberry Pi Pico.
Flashing the firmware
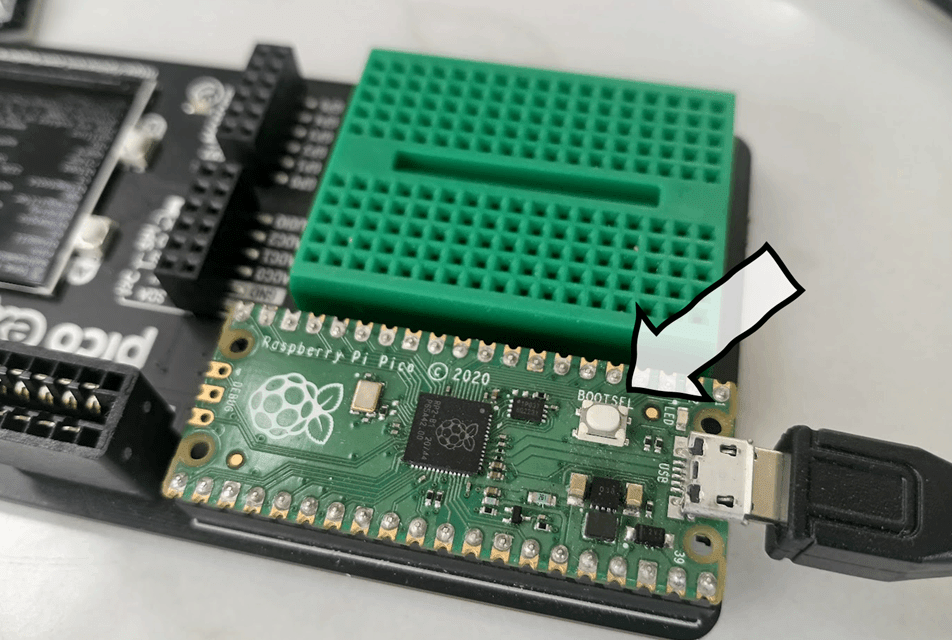
Make sure your raspberry pi pico is not plugged in to your computer. Hold down the BOOTSEL button on the pico as shown below, then plug in the pico into your computer.

I find it easier to leave the micro USB connector plugged in to the Pico and to disconnect / connect the larger USB A connector from the desktop / laptop. Be careful plugging in and unplugging the micro USB connector: they’re not very sturdy.
You should see your computer detect the pico as a USB storage device. If you don’t, you might be using a power only USB cable: try a different one until your computer detects a drive called RPI-RP2
Download the CircuitPython firmware and copy it to this drive. I’ve put a copy of the CircuitPython 9.2.1 firmware that I’m going to use in the Adventures in Electronics Github Repository. You’re looking for a UF2 file called adafruit-circuitpython-raspberry_pi_pico-en_GB-9.2.1.uf2
Once the uf2 file has copied successfully, the RPI-RP2 drive will disappear and the pico will reboot. You’re now ready to write code on your pico.
Note: I’ve also put a copy of the micropython UF2 firmware here if you want to try that instead. The process is the same: hold down the BOOTSEL button, plug in the Pico and copy the UF2 file to flash the firmware.
Writing and running Python
If you’ve ever written any python on a laptop or desktop before, you tend to write code on your computer and see it run on the same computer. For Adventures in Electronics, we want your code to run on the Raspberry Pi Pico itself: it should be able to run when disconnected from your laptop or desktop (e.g. powered by a battery in a satellite in space or in a box in the garden).
You still need a laptop or desktop to write the code and put it onto the pico, so that you can use the keyboard, mouse and screen to edit it and debug, but once you press run, your code will be copied onto the pico rather than running on your desktop / laptop.
When you install Thonny it’ll be set up to run python code on your computer: you’ll need to change it to use a different interpreter so that your code will run on the pico instead:
Open Thonny then click on the bottom right where it says Thonny's Python:

You should see an option for CircuitPython. It might be a different COM port to the one shown below – that’s fine. Click on the CircuitPython interpreter as shown below:

If it works, you should see a REPL in the shell window of Thonny that looks like this:

REPL: Read Evaluate Print Loop
A REPL lets you run code one line at a time in python.
Thonny will connect to CircuitPython on the pico and enter a REPL so that you can control it from your laptop / desktop
Copy and paste this code into the code editor window in Thonny then press the red run button
import board
import digitalio
import time

led = digitalio.DigitalInOut(board.LED)
led.direction = digitalio.Direction.OUTPUT

while True:
    led.value = True
    time.sleep(1)
    led.value = False
    time.sleep(1)Code language: JavaScript (javascript)
You should see the LED on the pico flash on and off every second
You’re now ready to plug in some sensors and get started with Adventures In Electronics!
