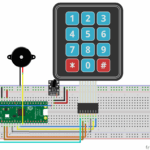
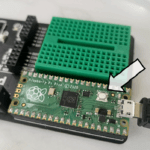
Every now and then I order something online then forget all about it until it arrives. Today one of these WIFI enabled IoT development boards arrived in the post:

Creating an IOT device with a Wemos-D1-Esp-Wroom-02-Motherboard-ESP8266-Mini-WiFi-NodeMCU-Module
I’d ordered it ages ago for less than £10 thinking it’d either make a fun project (Wifi enabled central heating controller?) or a prize for a keen student.
The thing arrived from China with no instructions at all and a quick search online didn’t throw up any beginners guides so this post will try to document my woefully inexperienced attempt at creating an IOT device.
You can buy one here for around £8.
What’s an Arduino?
Arduinos are tiny programmable computers that are more suited for creating Internet Of Things (IoT) devices than Raspberry Pis because you can run code in real time rather than having a complex operating system interrupting your code when it should be in the middle of some cleverly timed electronics input / output sequence to magically turn on your toaster or email you when someone presses the doorbell.
The pictured device is not an Arduino – it’s much cheaper and comes bundled with all sorts of additional geeky goodness – but it’s compatible with the excellent Arduino development tools that you can use to write and test code that looks and feels a lot like C / C++. Click here for more info about Arduinos.
Progress so far
I’ve tried to document each step of the process so far. I’ve not created a fully fledged Internet Of Things device yet but this post walks you through the stages of:
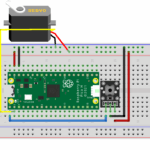
- Getting Started (setting up the development environment
- Running your first program (getting used to programming in the Arduino IDE)
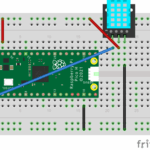
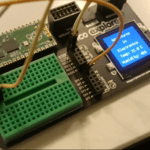
- Using the OLED screen (displaying text and graphics on the I2C OLED)
- Detecting input from the joystick (polling and interrupts to detect key presses)
- Making a game (using the device to make and play a flappy bird clone)


thank you very much for your help 🙂 I couldnt make it work without that
Hiyah!
The directional buttons: FLATH, RSET, D5, D6, D7
What on earth is FLATH?
Also – won’t RSET reset the board when the “direction” is pressed on the little joystick?
Yes, because of the way the joystick is connected up, the board will reset when you press left. I don’t know what FLATH is: it’s on all the description pages when you try to buy it but the joystick is actually connected to D3,D5,D6,D7 (and RSET). Maybe there’s a way to disable the reset-not sure-sorry!
I’m pretty sure FLATH is nothing but a typo from the first and original description (that has been copied wrongly every time)
This is the FLASH button. In order to FLASH another binary (firmware) this button has to be pressed while turning power ON.